
 AprilAire 500 Humidifier Parts Repair Help
Maintenance
Hi, I'm Jay, and today we're going to go over how to do normal maintenance on an AprilAire bypass style humidifier. Now, the humidifier happens to be mounted right up there, and that particular one happens to be a model 600. But really, all bypass humidifiers pretty much operate the same. So maintenance would be very similar on all the other models. This particular unit has been set up with a digital style humidistat, that happens to be duct mounted, that's right here. And we're going to want to turn this to the lowest setting, on this model it's all the way to the left, and we're going to go ahead and turn off the power and the water to the furnace and then we'll go ahead and start working on our humidifier. Find the saddle valve, turn it clockwise, until it stops.
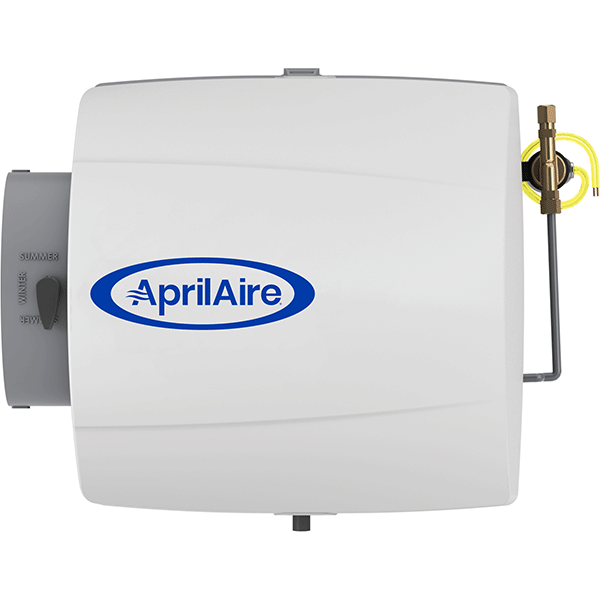
Ok, here we are at the model 600 humidifier. We're going to take the cover off of it first. Now we've already turned off the water and power to this humidifier as well as the power to the furnace. So, the way this operates is water comes through this pipe, up, goes through the solenoid valve. It is metered at this point, there is a small orifice in here, at the end of this feed tube. The feed tube comes up here at the top, it's attached to the water distribution tray here, water trickles down, while this is running. The water is trickling down the pad, the excess water stays in this pad frame here, on what is called a scale control insert, the excess water stays in that, and at the bottom here is a little nipple, and it goes into that and down the drain here. And it's taken away. So, during normal operation while this humidifier is operating, there will be water trickling down this drain, now, because this is a bypass humidifier, you'll notice that there's a damper here, ok, it's in the winter position which is open, and if we flip it up to the center position, that closes it. Now we'll go ahead and pull this pad out and take a look at it. Alright, on this particular model the tube just slides right in to this little loop at the top, ok, so now we're all set, we can take this apart, take the pad out, throw it in the trash, rinse off the distribution tray and the pad frame or scale control insert, slide a new pad into it, snap it all back together, and re-insert it. Put the bottom in first, snaps into the top, and we're going to put the feed tube back into place. There we go, and we're going to open the damper back up, and put the cover back on. Now there's a snap latch on the top, and a little latch on the bottom, you want to make sure that they both snap in, otherwise the door will get blown off when the furnace comes on. Ok, so now we have the cover on, damper back open, which is in the winter position, we turn the water back on, turn the power back on, and test it.
Thank you for watching, for this and other products, visit us at AirQualityParts.com
Troubleshooting: Water Always Running
Hi, I'm Jay. This is an AprilAire humidifier, and today we are going to diagnose why there is water continously running down the drain, even when we try to turn the humidifier off.
Ok, now we have a situation where we have water that is continuing to go down the humidifier. And it won't shut off, so what we're going to do is disconnect one of these wires, and what we have to do is disconnect just one. That will kill the electricty to the solenoid valve, and it should close. So, we'll disconnect this one wire carefully. Alright, the wire is disconnected, we now have no electricity to the solenoid valve, so at this point the water should shut off. But as I can see right now, the water is staying on, so our problem is the solenoid valve is stuck open. That's a common failure, these valves are easy to replace. A couple of screws, get your wrenches out, disconnect the water lines, reconnect them back up. Of course you'll want to turn off the water and electrical. But it's a simple job to do.
Thank you for watching, for this and other products, visit us at AirQualityParts.com
Troubleshooting: Water Not Running
Hi, I'm Jay, and today we are going to diagnose why there's not water running down the drain on this AprilAire humidifier, even though it's turned on.
First thing we want to do, is find out if we have water pressure here. So, first thing we want to do for that is turn the water off. Be sure to turn the power off before performing any maintenance. Before performing this service, it is necessary to shut off the water. Find the saddle valve, turn it clockwise, until it stops.
Alright, now that the power is turned off and the water is turned off, we're going to disconnect this line right here, which is the incoming water to the solenoid valve. We'll find out if we have water pressure here. So we got our wrenches, 1/2 inch and 7/16. Ok, now let's point this in the bucket, and get the water turned on. Alright, let's have our assistant turn the water on. Alright, that's good. Let's turn the water off. Ok, now, we have proven that we have water pressure at this point. So, that means everything up to this point is ok. So the problem is the solenoid valve, or the orifice or something else going wrong. Now, if we did not have water here at this point, when our assistant turned the water on, the problem is upstream. Probably that valve you turned on, is plugged up, and needs to be replaced or cleaned. Ok, now we're going to reconnect the water line. Alright, that's nice and snug. Now we can have our assistant turn the water back on, and we're going to turn the power back on, and test everything. Because we do have, at this point, good water pressure here. So now we're going to see what the problem is, if it's the solenoid valve or after the valve.
Ok, we have a volt meter out, we're going to check for electricity here. So, one at a time, we're going to carefully remove the wiring nuts, get out our volt meter, attach these, one to each probe, alright. There we go. And we turn our volt meter on, 0.05. So, we do not have electricty here. What we're looking for is something in the neighboorhood of 24 or so volts, AC. We do not have it, so our problem is we have no electricity to our solenoid valves, so of course it will not open without power. So the problem here, is upstream. So we may have a problem with out humidistat, there may be a problem with a transformer, but at least we know it's not the saddle valve, because, the problem is, the real problem is we don't have electricity.
Alternatively...
Now we're going to turn on our volt meter, and what we're looking for is somewhere in the volts of 24 AC power. As you can see, we have about 26.85 or so volts, so at this point, we do have electricity to our solenoid valve, and the water is turned on. But you'll notice, we don't have any water trickling down the drain, i can't hear any water, and if we pop the top off of this, humidifier, we'll see that there's no water coming out of the solenoid valve. So we have electricity to it. Earlier, we verified we have water feeding it, we have electricity, water to it, nothing out.
Alright, the water and electricity are turned off, we're going to go ahead and disconnect this. Alright, the feed tube is disconnected, now we're going to get a rag out, hold that up here just in case this valve actually opens. Alright, we're going to have our assistant turn the water and electricity back on. Alright, nothing. so, we have electricity turned on, the water is turned on, again, so we have pressure here, we have electricity here, we've tested that. There's nothing coming out of the valve; we have a bad solenoid valve. It is stuck closed. This is not an uncommon problem, so now all we have to do is replace the solenoid valve. Now if, when we turn the water back on and the electricity back on, we had water pressure here coming out at us, then the real problem would've been this orifice. Which gets plugged up perioidically. So, it's a normal maintenance item, just pop out the orifice, and slide a new one in.
Thank you for watching, for this and other products, visit us at AirQualityParts.com
Troubleshooting: Water Leaking
Hi, I'm Jay, and today we're going to talk about how to solve water leakage problems on your AprilAire humidifier. So let's talk about the possibilities here. You have water dripping from right here, ok that is a problem of the compression fitting. So the solution there is, turn the water off, cut this line back by like an inch or so, make a new connection here. You'll probably going to need a new ferrule if nothing else. You can reuse the nut, but you'll probably need a new ferrule, which you can pickup at a local hardware store. So that's if you have a leak here, another possibility is the valve body itself leaking. That's pretty rare, but it does happen. So if you have a valve body itself that's leaking, you need a new solenoid valve, there's no other solution. Another possiblity is, there is water dripping down your humidifier. So let's take the cover off this and take a look. Alright, so, lots of possibilites here with water dripping out of the humidifier. Normally, water should just trickle down the drain, but if you have water actually leaking out of the humidifier itself, out of the case, most common problem is "I haven't replaced the pad in years." If these pads calcify up, they will turn into a brick, and water will overflow it, and leak into the bottom of the humidifier, and it'll usually leak out the bottom here, out of the seam on this cabinet. so if you have that situation going on, you just haven't done your maintenance, because this pad needs to be replaced at least once a year. Another one that's common is the feed tube here. These feed tubes are made out of a very rigid plastic. And this plastic will get brittle because it gets attacked by the chemicals in the water, and also the heat from the furnace. They will get this plastic very dry, and brittle, and will crack, so you'll have a little seam crack in here. And it's tough to see it, but it's another common failure. Although, if your feed tube is cracked, it's a simple replacement. We sell them, you just turn off the water and replace the feed tube. Another thing that is somewhat common, is this. This is the scale control insert, a lot of people call it a pad frame. Over time, these again, this is plastic, will get brittle because they've been attacked by chemicals and water. So, sometimes these will crack, that's simple. Buy a new one, replace it. Same thing goes with this top piece here, this is the water distribution tray, they can also get brittle and crack, easily replaceable. Another thing that happens over time, is right here, hiding inside this feed tube, is an orifice. The orifice is a little nylon piece that is about the size of an eraser on a pencil. So it is a very small component. It has a microscopic hole in it that meters the amount of water that comes from the solenoid valve, up to the pad. So, if that little orifice gets too big of a hole in it, it will feed too much water, up to the top of the pad. And you will have too much water coming down here and it will be overflowing and leaking out. So that's another simple repair. Just turn off the water, turn off the electricity, unscrew this brass nut, remove the old one, put a new one in. It's not completely uncommon for someone who has waited way too long to replace their orifice, to find that the orifice is actually missing, because it's disentegrated, and it's just blown the pieces of it, or the fragments if you will, up the feed tube, and into the water distribution tray. So, if you open this up, and you find there's no orifice in it, well it's because it completely dissapeard on you. So, obviously you just pull the old one out with a pair of needlenose pliers if it's still there, push the new one in, put it all back together. Another thing that happens sometimes is down here, there's a drain spud. And it's another piece of hard plastic, this drain hose is attached to. If you over tighten this hose clamp, you're going to squeeze it and split it. And it will wind up leaking right here. The drain spud for most models, snaps right out. So you snap the old one out, snap the new one in, put the hose back on, another simple repair. And that's about it for all the common issues for leaking out your humidifier.
Thank you for watching, for this and other products, visit us at AirQualityParts.com
Humidistat Troubleshooting
Digital Humidistat Overview - Model 58/60
This is the model 58, digital humidistat. It comes with an outdoor air sensor, which is this, and also, a manual mode resistor. The manual mode resistor, when installed properly, as this one is, eliminates the need for installing the outdoor air temperature sensor. Now, in manual mode it will not know what the temperature is outside, so we'll NOT automatically adjust the humidity setting up and down, as the temperature changes throughout the day and season.
With the outdoor air temperature sensor, this sensor, when placed outside, will see the outdoor air temperature, and send the appropriate signal back, through the wiring, to the humidistat so it can raise and lower the humidity setting, based on how cold it is outside. And that's actually a better way to do it, that's why they give you both. This is the preferred method, if for some reason you can't put this in, you can always use the manual mode resistor.
Now, this one again has a manual mode resistor installed on it, and we can see right here, it's telling us that the humidity in this duct work right now, in our video studio is 38%. And if we spin this up here, we get it to the point where, we are setting the humidity level higher than that 38%, we've just turned that humidifier on. So it's now running. Now one of the important things is, there is a "test" button here. So, if we spin this all the way around to the "test" mode, the test mode will force the humidifier to run for one minute. And what it's really good for, is checking out your humidifier. So when you do maintenance to your humidifier, even in the summertime, no matter what the humidity is, you can always spin it from left all the way to off, all the way up to test position, it will force, you see the light came on, it forces the humidifier on, it will run it for one minute.
Now after that minute times out. It will start to blink, and the humidifier will no longer be running. So then what you have to do is spin it back around off, and back around on to get it to come back on.
Now the other thing this position does is it says "test" or reset. There is a little light here that says "change water panel" that is not on right now, and what that light is for is it's basically a timer. So after so many hours of operation of this humidistat, telling the humidifier to run, it will bring this little indicator light on that says "change water panel."
Now, it doesn't really know the water panel is bad, it doesn't know the humidifier is working, it doesn't know anything other than like an egg timer, after so many minutes, or in this case, so many hours, it will bring the light on.
Now the way to reset that is each time you change your humidifier pad, you should come around to your humidistat, spin it all the way up, to the "test" or reset position, leave it in that position for about a minute or so, and if you happen to have your "change water panel" light on, when this is happening, it will time out and shut off, then you can, after a minute or two, spin it back to your normal setting.
Thank you for watching, for this and other products, visit us at AirQualityParts.com
Troubleshooting: Humidistat E3 Error - Model 58/60
Hi I'm Jay, and today we are going to talk about how to diagnose your AprilAire digital humidistat. Alright, the light is blinking, and it says "call dealer for service," and we have an E3 fault code. E3 tells us, if you look at your manual, that there's a problem with the outdoor temperature sensor. Now, this one happens to have the "manual mode" resistor on it, so there is a problem with it, because that is what is attached in lieu of the outdoor temperature sensor. So, what we're going to want to do is turn the power off before we start messing with this thing, so let's kill the power first. Now that the power's turned off, let's take off the cover, pull the knob and snap off the cover. Ok, now if we take a look inside there, and we look real close at this manual mode resistor, you can see that the two wires that come from it are shorted out against each other, so we're just going to straighten that out. There we go, that's now straightened out, they were shorted out before, and now they're no longer shorted, so, they're separated, we're just going to go ahead while we're in here and just tighten up these two screws, attached to it, make sure they're tight, very good.
Alright, now we can put the cover on and turn the power back on and see what happens. Ok, we've separated the two wires that were touching each other on this manual mode resistor. We have the power back on. The "call dealer for service" light is no longer on. It no longer says E3 error code. Let's spin this around, see if our humidifier comes back on and test--Yep, our humidifier comes on. 36 percent, alright everything appears to be working just great now. So our only problem is our wires for the manual mode resistor were shorted out to each other.
Now the same thing will happen if one of the wires breaks, or if this manual mode resistor were to fail. That E3 code is telling you, that the value that is it looking for, is within a range, from X to Y, and it is out of range. It is either, not enough resistance, in other words shorted out, or a resistance value that's too high. Which would mean that one of the wires was broken. The same holds true for the outdoor temperature sensor. So here's an outdoor temperature sensor. Right here. Normally, for a lot of people, this is what is attached to those two terminals, the ODT Terminals, in lieu of this little resistor.
So what often happens with these is this little sensor here is stuck on an outside wall and maybe your dog chewed on it, or someone hit it with an implement or a tool. Uh, lawnmower or whatever. They've broken it. So once you break this device, you will have no signal coming back to the control, and it will kick up the E3 failure code. So, we're going to show you how to check this.
Now, we have the 58 model humidistat, and this has an outdoor temperature sensor on it. And everything is working fine, and we can flip this thing over here. If you take a look at the display, it says 37%, that's the humidity here in our video studio, we spin it around and we can get it turned on, we spin it to the test position. It says humidifier on, so we are now running the humidifier. We'll run it for about a minute, then it will start to blink, and it will eventually turn off the humidifier after one minute.
So we're going to see what happens when we have a fault code. And, the fault code we are going to use is E3. Ok, now we have an E3 error code, which is telling us there is a problem with the outdoor temperature sensor. So, we're going to turn off the power to the unit, get a meter out and check it. First thing we want to do, again, is turn off the power. Ok, we turned off the power to the furnace, and the humidifier. The display is blank, right now, so we're going to find out why we have an E3 error code.
Let's take the cover off, and right here we have the terminals, that are marked, ODT. Ok, we're going to disconnect these two wires, so we can get the sensor wires in our hands. Ok, I'm going to pull them both out.
Alright we're going to get our meter out and check the OHM value that we're reading here. Ok, there we go. So it says "overload." so, it's infinite resistance, basically. Which means, it's not seeing anything. So it doesn't see our outdoor air sensor at all. So what we're going to want to do is find out why, so we can go out to the sensor outside and take a look at it, and find out.
Ok, so we've gone outside and we've taken a look at out outdoor temperature sensor, and here's the new one, and we've found out that the end of this, of the temperature sensor outside, is missing. So it must have got hit by a shovel, or a dog chewed the end of it off, but anyways we're going to replace it. And see what happens.
So here's the new one, we're going to go outside and replace this now. Ok, so we've replaced the outdoor temperature sensor, and if we take a look here, kind of hard to see, but it says 46.4 K. So it's 46.4 thousand OHMS, resistance. Ok, so that equates, if you look at the chart in the owner's manual, that equates to about 20 degrees Fahrenheit outside. which, oddly enough, it happens to be. So it's 20 degrees outside, we get a value here of 46.4 thousand OHMS, that matches the temperature outside, everything is good.
So now all we have to do is reconnect these wires, and turn the power back on and test it. Ok, let's disconnect these, we're going to reinstall these wires. Let's put the cover back on. Reinstall the knob, there we are. Alright, leave that off for now. Now we'll turn the power back on and test it.
Ok, so we've switched the power back on, and as you can see, everything is working again, we no longer have the E3 error code, is telling us that the humidity in our space is 37 percent, and that is correct, so we're going to spin this around, and see if the humidifier will come on. Alright, we're spinning it around in the test position just for the heck of it, humidifier light came on, the humidifier is now running, everything is working great. So, we're fixed. Now we can set this back, to whatever setting we want. So we're going to leave it on 5 right now.
Thank you for watching, for this and other products, visit us, at AirQualityParts.com.
Troubleshooting: Humidistat No Display - Model 58/60
Hi, I'm Jay, and today we are going to talk about how to diagnose your AprilAire digital humidistat. Ok, this digital humidistat has no display right now. So, we're going to check for electricity to make sure that it has power, if it doesn't have power, the problem is ahead of it somewhere. If it does have power and the display is dead, that's a bad humidistat.
Ok, let's take the cover off and check for voltage. Ok, we're going to check at the R terminal and the C terminal. And according to my meter, I have .001 volts so I have no power here. So we should be reading anywhere from 0.22 to 0.29 volts at this point. Since I don't have any electricity, the problem is probably in the furnace, or a transformer somewhere, but it is not with the humidistat. If I had power here, and the display was blank like this, I would have a bad humidistat, which would need to be replaced.
Thank you for watching. For this and other product, visit us at AirQualityParts.com.
FAQs
HVAC Typical Layout Overview
Hi, I'm Jay, and this is our demo unit. We often get questions asking what the individual components are, so we thought we'd talk about that today. So, on this demo unit, this is the return air duct work, so this would be the duct work that brings the air from your home into the furnace to get heated or cooled. So, on the side here we happened to have a return air grill, like you typically find on the wall or ceiling of a home. The air would come down here, through the return air grill, down this duct.
This happens to be a humidistat. This can be mounted on the return air duct, which is the most common location you'll find these humidistats. This one is a digital one, there are mechanical ones as well. They are, again, most often mounted on the return air duct. Although sometimes they can be mounted, certain models at least, inside the home. And when they're done that way, they are often very closely mounted to the thermostat. so, like within a foot or two of the thermostat.
So anyways the air from your home would be sucked into the return air grill, come down this duct, go this way, turn, go through the air cleaner, into the furnace, there's a blower down here in this furnace, inside here is the heating chamber, so it goes through the heat exchanger, the air goes up through the heat exchanger, this happens to be a cooling coil, so if you have air conditioning, you'll have one of these directly above your furnace. So, inside of this is a radiator looking device, so the air that goes through this would be cooled in the summertime, and it goes up into the supply plenum, and gets discharged into your home. So, in the wintertime, the supply plenum would be hot air into this, and it would blow up into the duct work, and come out of the registers in your house.
This is the flu pipe, for the furnace, we don't happen to have a gas line attached to this demo unit, but if we did, the gas would go up through this and outside the home.
The air cleaner here, this happens to be the AprilAire 5000 air cleaner, and if you look closely at the front, you'll see it mentions the model number here, so the air comes from your home, through the return air grill, down the return air duct, happens to pass the humidistat, goes down, goes through the air cleaner, gets cleaned, goes into the furnace, gets heated in the wintertime, or, cooled in the summertime, comes out into the supply plenum, and gets blown back into your home.
Our demo unit has a humidifier, this is a 600 model AprilAire, mounted on the side of it, you'll see that there's a model number here, and there's also a sticker over here on the side. That gives you the model and serial number. This one being a 600, it's a bypass style humidifier. So there's a 6 inch around bypass duct that's attached here, it comes around, and it's attached to the return air duct work, which we discussed earlier. There is also a drain line on this humidifier, so whenever the humidifier is running, water will trickle down the drain. Here's the water line. And this is the low voltage control wiring, for the humidifier. That drain comes down here, then gets attached to the air conditioner drain here. They go down, this particular model happens to be set up with a condensate pump, for our demonstration room here.
This is the cooling coil, supply plenum, so in the wintertime, the furnace would heat the air, it would then blow it through the cooling coil which would not be functional in the winter time, the air would then go into the supply plenum here, go up, and then come out and get blown into your home.
Thank you for watching, for this and other products, visit us at AirQualityParts.com
Still Need Help?
Live help is available. Feel free to contact us.
Browser Not Supported
You are using Internet Explorer as your browser, which is no longer supported by our website. Because of this, you can view products but not place orders using Internet Explorer on our site.
Please update your browser to any of the modern browsers listed below or use a different internet browser to place an order on this site.
If you have any questions or need assistance with placing an order, please contact us at 800-825-2148 or [email protected]


